
A beautiful photo alone can hardly meet today's standards. Before the release button of the camera is pressed, it is a necessity that thoughts are given on what should be shown and what not. But to accomplish this, it is just as essential that we become familiar with our camera tools. What brings us a beautiful composition and a representative image, if this is much too bright?
For a correctly exposed image, there are only three parameters that can be changed: the exposure time, the aperture of the lens and the ISO value (photosensitivity). These three parameters have an influence on the brightness of the image, but also bring other side effects with it, which i.a. can affect the sharpness or style. All of you who are going to shoot manually for the first time should switch the Autofocus-Mode. The Autofocus (AF) usually works very reliably with sufficient light. If the image is blurred, it can be assumed in the most cases that it was due to other settings, which have led to a blurred image (e.g. too long exposure time).
The Exposure Time or Shutter Speed
The exposure time, or simply called shutter speed, defines the time frame in which an image is captured. At very short exposure times, quickly moving objects appear sharply frozen. With a short exposure time it might be possible to capture a bursting balloon exactly during the short moment of its burst. Very long exposure times achieve the opposite effect and create a blurr effect on moving objects. With an exposure times of a whole second it is possible to create a blurry ghost-effect on moving persons.

Due to the long exposure time a motion blur on moving persons is visible. The rest of the interior shoot appears completely sharp, since it wasn’t moving and the camera was mounted on a tripod.
Nikon D800E | ISO 100 | focal lenght 18mm (Tamron 15-30 2.8 SP) | f 5.6 | exposure time 1/3 Sec (ND 64x)

Very fast moving objects appear very sharp as frozen with short exposure times.
DJI Phantom 4 Pro | ISO 100 | focal lenght 24mm (equivalent) | f 5.0 | Shutter Speed 1/640 Sec
The exposure time is responsible for whether a sharp shot succeeds or not. By choosing the right exposure time, you can shoot very sharp pictures without the need of a tripod. Since usually no photographer is able to keep his camera absolutely still, the shortest possible exposure time must be selected, which is able to compensate for our wobble. If possible, the photo should be created within such a short exposure time before the opportunity for a visible blur is given.
One rule says that the exposure time should be at least equal to the reciprocal of the focal length. The focal length is usually marked on the lens and is given in millimeters (mm), it corresponds approximately to the angle of view. Small focal lengths of e.g. 16 mm have a very large angle of view and are typical for wide-angle lenses, with which in a very narrow space it is possible to get a lot into the frame. In contrast, when zoomed in, the focal length of the lens increases. A focal length of 200 mm is typical for a telephoto lens, it is suitable to photograph small objects from a distance.
The exposure time should correspond to the reciprocal of the focal length. With a 200 mm lens, the exposure time should be at least 1/200 sec to take photos without a tripod. At 50mm focal length, the maximum shutter speed would be 1/50 sec. For longer shutter speeds, there is a risk of camera shake if photographed without a tripod, and the image might occur slightly blurred. Shorter exposure times, however, are unproblematic in terms of sharpness. With a 50 mm lens, it is also possible to take sharp pictures with 1/1000 sec; 1/50 sec would also be fine, longer exposure times such as. 1/40 sec, on the other hand, can cause visible blur. Even when photographing within this rule, a closer look makes sense to ensure that everything is really sharp. Ultimately, this also depends on how still you can keep the camera. Furthermore, it depends on the resolution of the camera: On a higher resulution a blur will appear visible much earlier than on a low resolution camera.
For many cameras it must be ensured that the specified exposure times always represent mathematical fractions, but most cameras can not display a fraction bar. This is often confusing at the beginning. Instead of „1/50 sec“ on the camera display only a numerical value of 50 appears. A value of 80 therefore represents a shorter exposure time than a value of 50, since it should correctly be red as 1/80 sec. In case behind the number a quotation mark ist shown, this represent the symbol for whole seconds. The value of 10" does not stand for a 1/10 sec, but for a whole 10 seconds! Nobody is able to keep the camera absolutely still for such a long exposure time of several seconds. With a tripod this is, however, not an issue at all.
The rule, which says that the exposure time must correspond to the reciprocal of the focal length, is therefore a very important one. However, this refers only to the shaking of the photographer by his own motion. In the case of very fast moving objects (e.g., traveling vehicles, athletes, animals), a much shorter exposure time must be selected than what is the case with architectural photographs or landscapes. For photographing still objects, e.g. real estate, modern image stabilizers can compensate for the self-movement of the photographer and allow up to a five times longer exposure times, then what would be the case after the rule of thumb.
In this context the exposure time can also bee seen as a design element in architectural photography, since moving objects can be blurred intentionally, while still objects appear sharp when a tripod is used.
The incident amount of light and thus the brightness of the image can also be controlled by the exposure time. The longer the exposure time is, the more light hits the sensor and the brighter the final image appears. If no effect of a certain motion blur is desired, the exposure time is used to regulate the brightness. The gradations between the brightnesses are specified in "stops". One stop halves or doubles the brightness. A twice as long exposure time doubles the brightness as well. Between 1/30 sec and 1/60 sec there is a difference in brightness from one stop. Modern cameras usually allow gradations of one-third stops. Between the different parameters of time, aperture and ISO, the brightness differences in the adjustable steps are always the same.
The Aperure and F-Stops
The aperture of the lens is comparable to the pupil of the human eye. The aperture represents a mechanical piece with which the width of the lens opening can be regulated. The aperture is almost always designed as a lamellar shutter. The larger the aperture, the more light gets onto the camera sensor and the brighter the picture becomes. The width of the aperture is indicated by a number, the aperture value or f-numbers. For beginners it is often a bit confusing that a small number like f1.8 describes a large aperture, while a large number like f20 represents a very small aperture. The larger the number is, the smaller the aperture becomes.
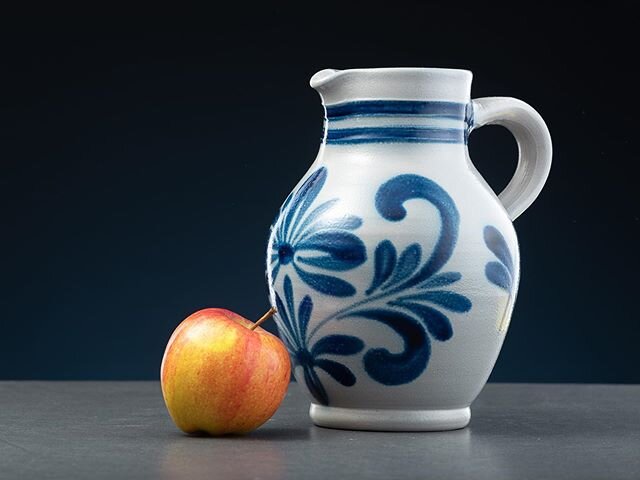
Similar to the exposure time, the size of the aperture has an influence on the amount of incident light and thus on the brightness of the image. However, this represents also an essential design element, albeit in other respects. The size of the aperture determines the depth of field, on the one hand, and it also influences the image quality with regard to the overall sharpness andvignetting. With an open aperture (large aperture and small numerical value), the depth of field is very low: If the image is focused on the foreground, it can happen that the background is already completely out of focus. With a closed aperture results with a great depth of field are expected.

With an large Aperture (small value) the fore- & background appears blurry and unsharp, while the subject which is in focus will appear sharp. The result of an opened wide Aperture is a low depth of field.
Nikon D850 | ISO 64 | focal lenght 35mm (Zeiss Distagon 35 2.0) | Aperture f 2.8 | Exposure Time 1/50 Sec

With a very small Aperture (high value) the depth of field increases and almost everything appears sharp and in focus.
Nikon D810 | ISO 64 | focal lenght 20mm (Voigtländer 20mm f3.5) | Aperture f/9 | Exposure Time 1/40 Sec (DRI)
However, the depth of field does not depend solely on the aperture value; It depents also on the lenses focal length and the distance from the camera to the subject, as well as from the distance between the subject and the background. Thus, with an extreme wide angle of 14 mm, even at open apertures, almost everything will appear sharp, while with a 300 mm telephoto lens even with a closed aperture of f10 a clear blur can be visible. As soon as the subject is approached, it is also easier to get the background out of focus. On the other hand, if the flower vase (sown in the picture above) had been photographed from the far corner of the room, the wall behind it would be crisp and sharp even at a wide open aperture.

On the left site a large Aperture with a value of f/1.4 is shown. On the right site a small Aperture with a value of f/16 is presented.
The Figure shows a 50mm lens with a 1: 1.4 aperture. The aperture was opened here at a Maximum. An alternative notation for the aperture value would be f/1.4 in this case, but can also be named as an „Aperture 1.4“ or just „f 1.4“. In the right part of the illustration, the aperture is closed at a value of f/16. The indication of e.g. 1: 1.4 on the lens, indicates the maximum value of how much the aperture can be openened. On the other hand, smaller apertures (larger numbers) can almost always be adjusted. The smaller the specified number on the lens, the brighter this is usually is.
The larger the aperture value or f-number, the smaller the aperture and the less light passes through the lens, at the same time the depth of field is increasing. In addition to the increasing depth of field, there is another effect when the aperture is closed: highlights appear increasingly star-shaped and form visible light rays. At large apertures (small values), the depth of field decreases significantly and the picture appears brighter at the same time. When the aperture is open, however, highlights appear soft and inconspicuous. Aperture stars are then no longer visible.

Sharp Highlights will appear star shaped at a closed Aperture. These stars are also called Sunstars or diffraction spikes. The shape of these light stars depends strongly on the used lens.
Nikon D810 | ISO 100 | focal lenght 50mm (Nikkor 50 1.4D) | Aperture f/11 | Exposure time 30 Sec.
On zoom lenses are often indications such. 18-55 mm, 1: 3.5-5.6. This is due to the fact that zoom lenses often have a different maximum aperture at different focal lengths (zoom levels). With a focal length of 18 mm, the aperture can be opened to a maximum of an value about f/3.5; at 55 mm, however, the maximum value is f/5.6. Too large, as well as too small aperture values are often associated with aberrations: Large apertures like f/1.4 can causes a slight blurring or chromatic aberrations and an increased vignetting (darkening of the image border). For very small apertures, e.g. f/16 the effect of diffraction blur increases on the other hand. In that sense, choosing the right aperture is always a compromise of artistic design using depth of field and aperture stars, as well as the loss of image quality in both directions. Most lenses achieve their best optical performance between f/4 and f/8.
TYPICAL F-NUMBERS
sorted from large to small aperture
0.95, 1.2, 1.4, 1.6, 1.8, 2, 2.2, 2.5, 2.8, 3.2, 3.5, 4, 4.5, 5, 5.6, 6.3, 7.1, 8, 9, 10,11, 13, 14, 16…
The numbers listed above represent the aperture row in third f-stops, which can often be adjusted by modern cameras. Older lenses often do not have that many intermediate steps.
Whole aperture values are calculated as follows:
k=(√2)^(n-1)In this case, the incident amount of light is halved or doubled with each complete aperture step. This means that an aperture with the value f/2.8 is twice as large as an aperture with the value f/4. With most wide-angle lenses up to approx. 24 mm, it is possible to work very well in architectural photography with aperture values between f/6.3 and f/8. At those values a sufficient depth of field and a maximum resolution and acceptable vignetting can be expected. However, if you want to creatively play with the blur or the aperture stars, you should use more extreme aperture values.
The ISO Number and the digital signal amplification
Unlike to the analogue photography, the ISO sensitivity (formerly known as ASA film speed) can now be changed separately from image to image. The higher the ISO value, the brighter the picture becomes. In analog photography, the ISO value described the photosensitivity of the film. Small values such as ISO 64 stands for a low photosensitivity, while very high values, e.g. ISO 3.200 describe a directly proportional higher photosensitivity and will cause brighter pictures. In modern digital cameras the ISO value no longer belongs to the "exposure triangle" because the sensor's photosensitivity can not really be changed. Changing the ISO setting in a digital camera does not change the real photosensitivity, instead an electronic signal gain is added to the image, which only digitally simulates an higher ISO photosensitivity. A higher ISO number brightens the image artificially. This electronic signal amplification amplifies all picture information and minimal signal fluctuations equally; the result of an extreme amplification is visible as noise. When it comes to the highest quality in difficult lighting conditions, this requires manual control of the ISO setting. The ISO value should only be chosen as high as necessary and as low as possible.
All ISO settings that differ from the camera’s native sensor sensitivity are achieved electronically and are therefore associated with a loss of image quality. The well-known image noise at high ISO values is just one example of this. However, with higher ISO values, the dynamic range, the contrast and color fastness are also worse.

ISO value of 2000: At this 10x magnification a disruptive image noise is strongy visible due to the high ISO-setting.
ISO INVARIANCE - WHAT IS IT?
Depending on the processor's internal signal processing, the resulting RAW files may have a slight ISO invariance. This means that a photo taken at low ISO and subsequently digitally brightened within a program like Adobe Lightroom does not differ much from a photograph, taken directly at a higher ISO. In practice, this means that the ISO value can be changed later in post-processing. But beware: this does not apply to all cameras! Whether a camera is ISO invariant also depends on how the processor saves the RAW file. In addition, cameras are rarely 100% ISO invariant: An image with ISO 500 will generally have slightly less noise than an image with ISO 100, which has been brightened by a factor of five in post. In case of the Sony A7iii, for example, an almost perfect ISO invariance does not occur until around ISO 800-1000 (similar to the Nikon D750, D810, D850). This is because with a higher ISO setting, the signal gain in the camera already takes place before the AD converter. Logically, this step would only come after digital image processing. The correct order of the signal amplification has a slight influence on the noise behavior. At low ISO values, the difference is more visible, while with already high ISO values, this effect is still present, but hardly visible. Therefore, a "true" ISO invariance usually only occurs at higher ISO values. Thus, this effect is more relevant for concert photographers than this is for architectural or estate photographers. In contrast to the widespread opinion in numerous Internet forums, the correct ISO setting is therefore notunimportant. The camera settings should be as perfect as possible so that the picture looks as good as possible on the camera's display.
Interaction between time, aperture & ISO
Altogether there are two possible settings for producing a correctly exposed image: the exposure time and the aperture. With the ISO setting, the correct exposure of the image can only be optimized electronically.
If a high depth of field is desired, the aperture has to be closed, whereby the picture appears darker at the same time. If there is a moving object in the picture at the same time whose movement should be captured in order to make it clear, then the exposure time must also be kept relatively short. This also leads to a darker picture. With a higher ISO setting it is possible to brighten the picture. However, increased ISO values are accompanied by increased image noise and a lower color, contrast or dynamic range. Due to the quality loss, the ISO value should not be set unnecessarily high. It is therefore advisable to set the ISO value only as high as necessary and as low as possible.
Assuming a 50 mm lens: A photo with a blurred background should be created. For this reason, a maximum aperture of f/1.8 might be selected. In addition, an exposure time of 1/50 sec and an ISO value of 100 are set. The camera-internal exposure metering indicates that the picture is underexposed by one stop. The aperture can not be opened further. When extending the exposure time to 1/25 sec, there is a risk of camera shake if photographed without a tripod. In this case, the ISO value must be set to 200 to get a correctly exposed image. There is a linear relationship.
For most architectural photographs, the ISO setting is set very low (on the tripod, between ISO 64 and ISO 100), then the sharpness is adjusted via the aperture (e.g., f/7.1). The brightness will usually be adjusted over the exposure time. If certain effects such as aperture stars, blurred background or wiping effects are desired, the settings must be changes of course.
What does “Stop” or “F-Stop” means?
The brightness differences are given in aperture stops. In the camera, the time, aperture and ISO can each be set in small increments of one-third f-stops. An aperture level doubles or halves the brightness of the image. If the time, aperture or the ISO setting is changed by three steps, the brightness is halved or doubled accordingly. If the ISO value is increased by one step and the aperture is closed by one step at the same time, the overall brightness of the image remains the same.
Set and interpret the exposure correctly
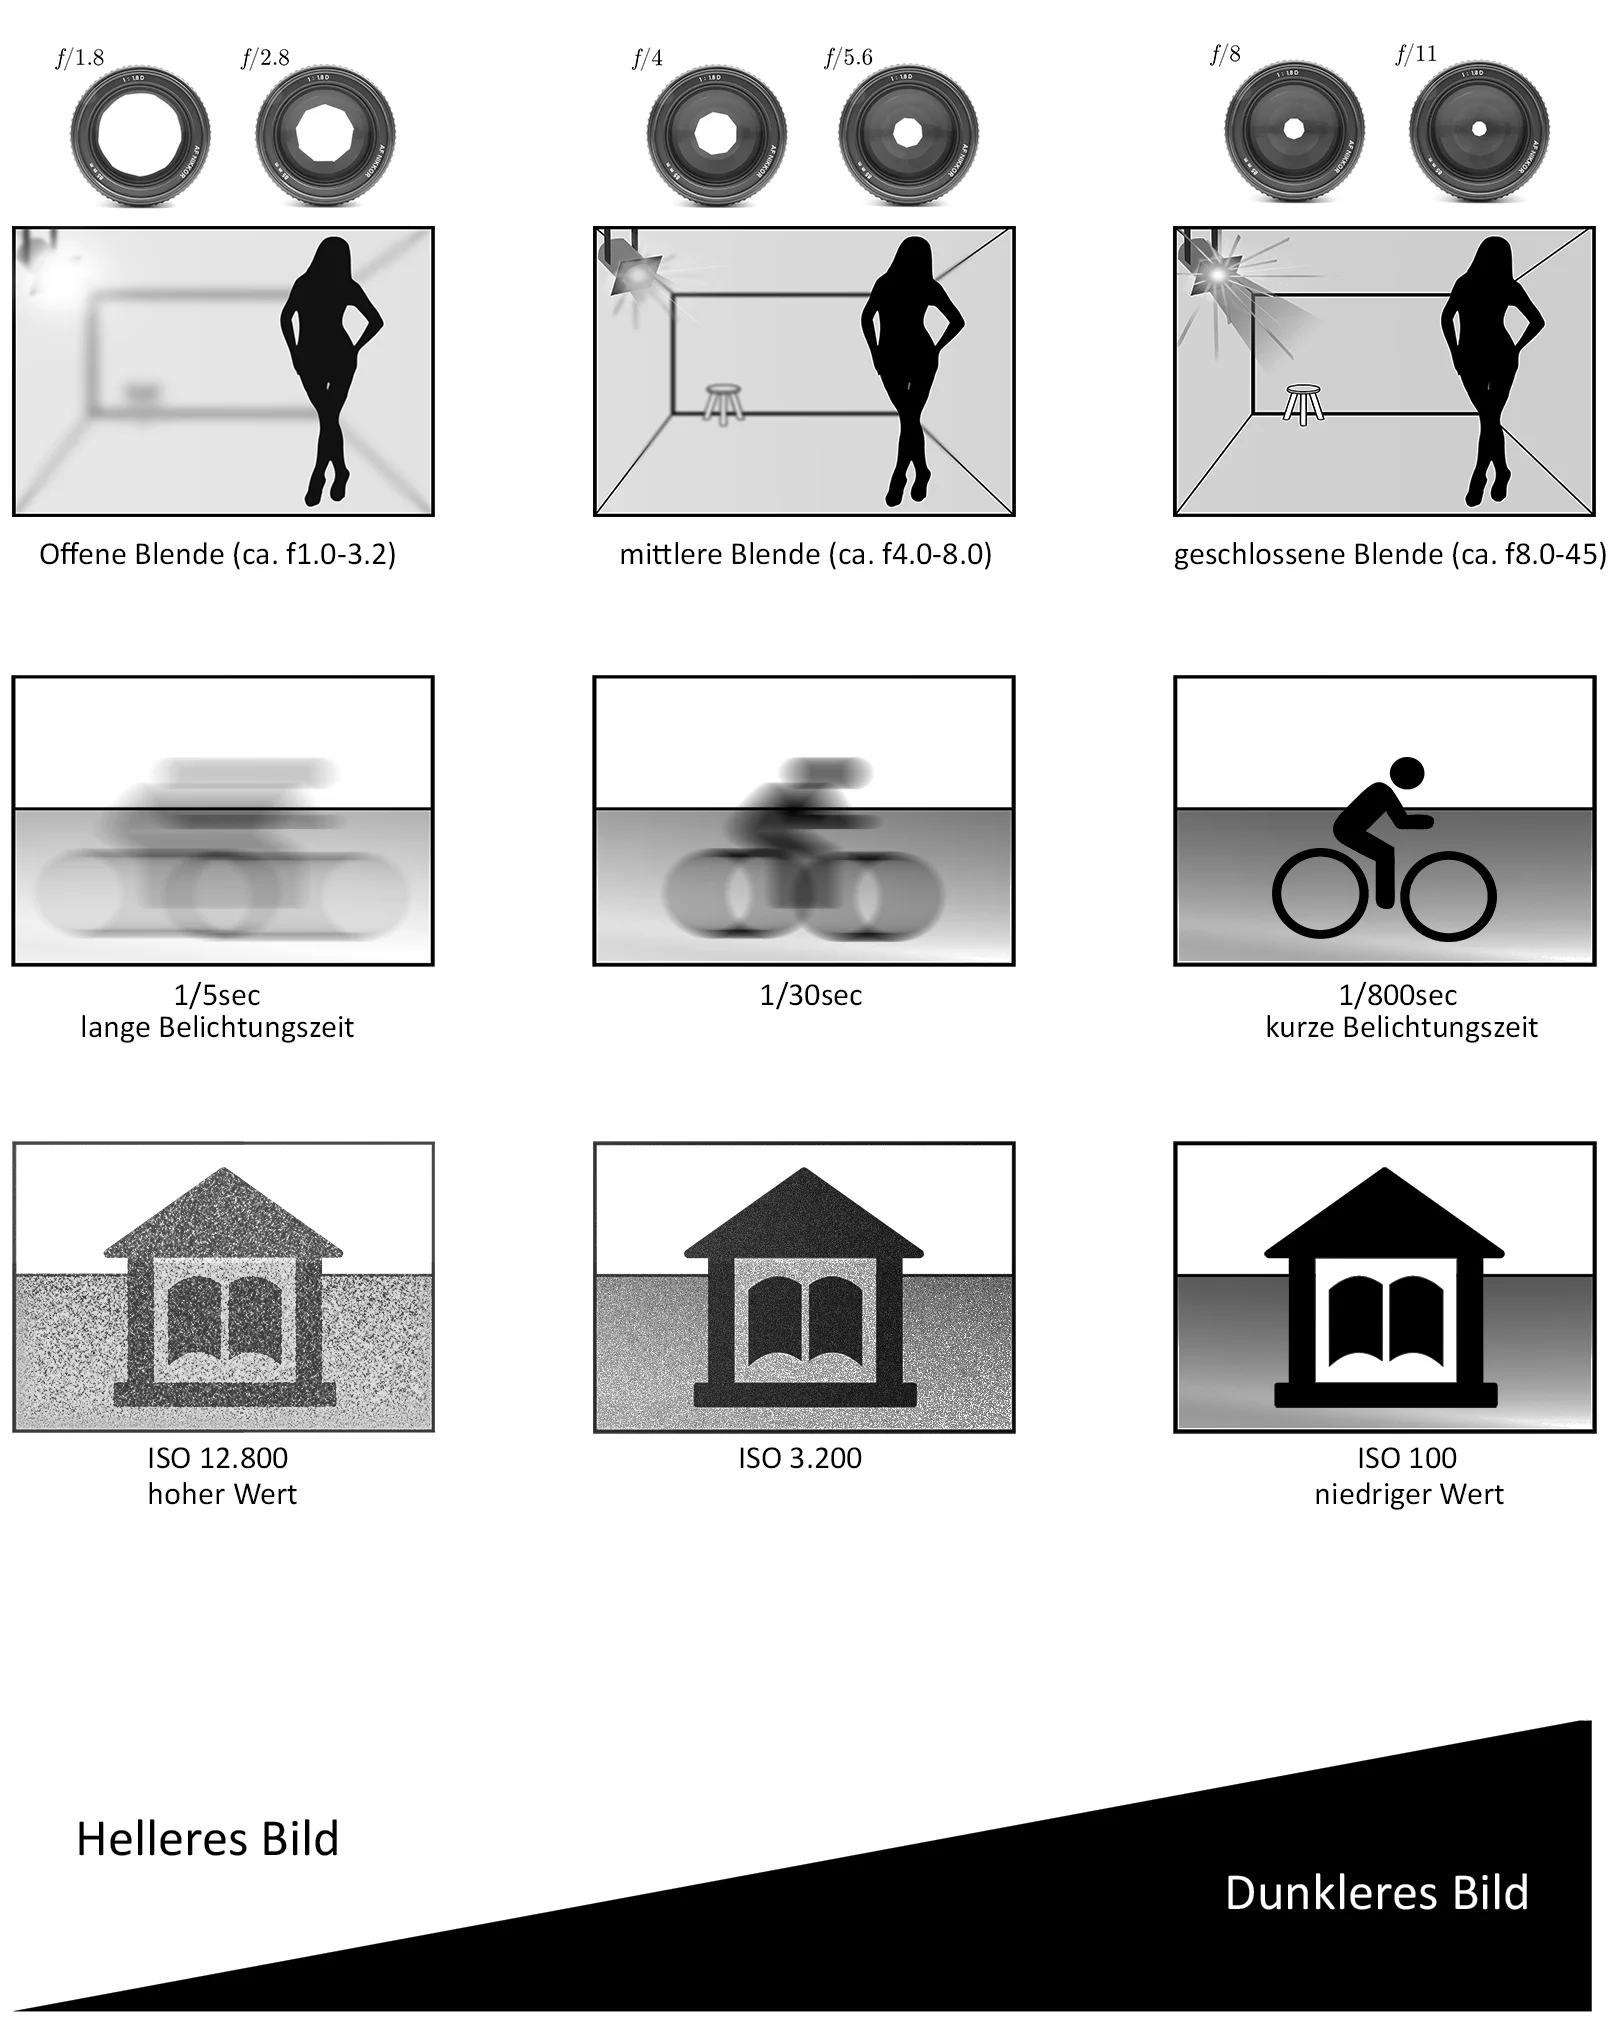
Photography Basics: Learn interaction between the camera settings Aperture, Time & ISO. The Settings on the left site will result in brighter images, whereas the settings on the right will create dark results.
exposure time / Shutter Speed
The shorter the exposure time, the sharper moving objects appear. The longer the exposure time, the more likely motion blur will be visible. When shooting without a tripod, the exposure time must be at least the reciprocal of the focal length. If e.g. photographed with a 50 mm lens, the exposure time should not exceed 1/50 sec (1/100 sec will be ok, but 1/40 sec might be to long).
Aperture / f-number
The larger the number, the smaller the aperture. When the aperture is open (small value) a small depth of field is present; The foreground and background appear out of focus and blurry. When the iris or aperture is closed (large value), the depth of field is greatest and sharp highlights appear in a star shape.
ISO sensitivity / Gain
The ISO value was a measure of the photosensitivity of films and is today simulated by a digital signal amplification. With this, the correct exposure of the image can be compensated. Is e.g. a high depth of field desired, the aperture must be closed, which results also in a darker image. With a higher ISO value, the image becomes brighter again. However, this is accompanied by an increased image noise and a lower image quality. The ISO value should not be unnecessarily high. ISO values between 64 and max. 320 are considered optimal. With values from ISO 400 to 1000, good results can generally be achieved. Above ISO 3.200 it often gets critical. However, this also depends heavily on the camera model and can sometimes vary greatly. Especially as a some noise ist less noticeable in some subjects.


Here you will find a short introduction and explanation of the characteristics and designations of lenses and the most important features for architectural photography. Of course, explicit purchase recommendations from our best list are also given.