Metering Modes of your camera
With regard to the automatic determination of the correct exposure, there are various measuring methods. In architectural photography, photographs should be taken in manual mode M anyway. As shown above, the exposure value represented by the bar graph is the result of the interaction of exposure time, the aperture and ISO value. When only one of these three parameters changes, the exposure will change as well and the image becomes brighter or darker, while the bar-graph moves towards left or right accordingly. As soon as this reaches the zero value in the middle, the image should be correctly exposed, according to the camera's internal software. The method of exposure metering only influences the position of the bar graph, which gives information about the exposure. Furthermore, an exposure compensation can be set in the camera, which defines the zero value differently or shifts it to the left or right. The starting point (=zero value) can vary depending on the method; however, the fine adjustment should anyway be made using the histogram according to the ETTR principle, which will be discussed below.

The bar graph provides information about the exposure. In this example, the image is underexposed by one f-stop (-1 EV); so it's a little too dark.
The bar graph is probably familiar to everyone. After all, almost every camera has this type of display with regard to exposure metering. The fraction of 1/20, as in this example, indicates the set exposure time in seconds (1/20 sec). In some cameras, instead of the fraction, only a number like e.g. 20 is displayed, which stands for 1/20 sec. If there is a quotation mark after the number, it represents a whole second; 20" would therefore correspond to whole 20 seconds. To the right of it the aperture value is displayed. In this example a aperture-value of f/2.8 is set and below the photosensitivity value of ISO 125 is shown. When the values set in the camera are changed, you will notice that the highlighted bar in the middle begins to move. This in-camera metering indicator shows the approximate exposure of the image. In this example, the image would be underexposed by one f-stop (-1 EV), i.e. it would be slightly too dark. This can be corrected by increasing the exposure time accordingly, opening the aperture further and/or increasing the ISO value. The exposure estimated by the camera as optimal is given when the displayed bar is at zero. However, the automatic exposure metering is only for orientation, because in some cases it is useful to over- or underexpose an image. Ideally, the final result should be checked by means of the histogram.
With regard to exposure metering, there are different modes: For example, the integral metering (Average metering), in which an average value of the entire image is calculated, or the center-weighted average metering, in which the metering points in the middle of the image are more important than the metering points at the edges. But what all modes have in common is that the camera considers an image as optimally exposed when the average luminosity reaches a 50-percent grey value. If it is now very dark outside, the camera would brighten the picture until the 50% value is reached. The result would be an image that is much too bright for our perception, since it does not correspond to what was seen with the naked eye. Nevertheless, it can be useful to take pictures like this. The automatic exposure metering works very well during the day, but during the blue hour or at night, you should deliberately shoot underexposed if you are working with the JPEG format. Especially the twilight is a bit complicated due to the fast changing light conditions. Here some test patterns should be created and simply checked on the display. Afterwards it is checked whether the set exposure is satisfactory. However, the settings should be checked at least every 5 minutes and updated if necessary. Manual camera mode M is best suited for this.
The integral measurement (Average metering)
For the integral measurement, all measuring points distributed over the sensor are included equally in the calculation. From the different exposure values, an average value is calculated from which the correct exposure is determined. This method is more suitable for low-contrast subjects (e.g. in heavily cloudy conditions).
The center-weighted metering
In contrast to the integral measurement, the middle measuring fields are more strongly included in the calculation than measuring fields located at the edges. This method is more suitable for high-contrast subjects than the integral measurement. The disadvantage of this method, however, is that the main subject should be in the center of the image in order to perform a correct measurement. However, with many cameras, the exposure can be saved with the shutter release button half-pressed. This makes it easy to achieve a correct exposure. To do this, the subject is first centered, the shutter-release button is pressed halfway, the image section is changed in terms of composition, and finally the actual image is taken. In manual mode M, it's easier because you don't have to press the shutter button halfway, because the values don't change automatically anyway. With the center-weighted measurement you are almost always on the right side, even under slightly complicated conditions.
The matrix measurement (Multi-zone metering)
The exposure is determined over several measuring fields and is based on highly complex algorithms. In addition to brightness, the color distribution is also taken into account, so that the camera recognizes typical motif situations and carries out a profile correction in this respect. However, as is the case with fully automatic systems, the camera may misinterpret the situation. In most cases, however, this function works very reliably and is extremely precise under standard situations, but is not supported by all camera models.
Spot Metering
Only a single measuring point is used for spot metering. With most cameras, the desired measuring field can be selected from a variety of fields. Alternatively, as with center-weighted measurement, a half-pressed trigger can be used. When it comes to exposing only a small important detail in the image correctly, spot metering is the right method.
Some cameras even offer the possibility of fine tuning between the different types of exposure metering. Thus, all measuring methods are carried out by the camera at the same time, and the weighting of the individual results of the individual methods can be pre-set to determine the extent to which the individual results are incorporated into the final result. A weighted average is calculated from these presettings. However, this is more interesting for sports & event photographers, if there is only one attempt and the exposure has to be right at the first and only time. In architectural photography, there is usually enough time to perfect the exposure manually. Therefore, the results of the exposure measurement are used as a rough orientation point, which has to be refined afterwards. The method of center-weighted measurement is therefore sufficiently suitable for 90% of our motifs.
Understanding the Histogram
The automatic exposure metering provides a rough indication of the expected correct exposure of an image before it is taken. After the photo has been captured (or in Live View), the exposure can be controlled much more precisely via the histogram.
The decisive factor here is the correct selection of the Picture Style. JPEG files are processed fully automatically by your camera; they are therefore strictly speaking not “unedited”. There is the possibility to select image styles such as Monochrome, Portrait, Landscape, Standard, Brilliant, Faithful, etc. In Landscape mode, for example, the green and blue colours are enhanced, the image is sharpened and the contrast is maximized. This makes dark areas appear much darker than they actually are and the histogram is distorted.
The image styles "Flat"or "Neutral"reproduce the image relatively unaltered and should therefore be used when shooting in RAW format. Although the image style has no influence on the raw file itself, it makes it easier to interpret the preview image correctly since the histogram always correspond to your JPEG-preview, even when shooting in RAW. The advantage is that it is possible to estimate on the camera display what can be extracted from the image in post-processing. The histogram values, which refer to the preview image, are largely unaltered in these modes. However, this makes the images appear relatively dull, pale and low in contrast. This is another reason to shoot in RAW format, as the image style can be changed later. The pre-selection of the image style is only used to preview the image with the corresponding histogram on the camera display. What exactly the RAW format is and what advantages it offers will be discussed in a following blog post. All those who still take pictures in JPEG should first choose the picture style that visually pleases them best. Not so in RAW…

Correctly exposed image. The histogram covers almost the entire spectrum, with the majority of the values in the middle greys. The white areas on the far right are just touched, only a few pixels are maximally bright.
With a reasonably correctly exposed image, most of the image is in the center of the histogram. The extreme values of 100 % black and 100 % white are almost non-existent. If an image is deliberately under- or overexposed, this is referred to as Low- or High-Key style.
Here, the maximum values are located on the left (low-key) or right (high-key) side of the histogram. But even in this case, pure black or white values should be avoided over a large area. If the histogram looks like the example above, most of the details can be easily seen, since a wide range is covered.

An underexposed and too dark picture is shown. There is no longer a white pixel included (low sensor saturation) and the left area in the histogram is clearly touched. Too high black values represent "flooded" shady areas from which no details can be reconstructed.

Overexposed Photograph: The image is much too bright because the values are piling up on the right part of the histogram. This means that there are too many white values. The large white areas are "burned out" and contains no details that could be recovered.
If the histogram looks like this example, the image is completely underexposed. Some parts of the image are even completely black and do not contain any details.
If the histogram looks like the last example, it is overexposed. Although there are more details to be seen here than in the underexposed example, as a much wider luminance spectrum is covered, completely white and structureless areas appear here as well. If the image would be darkened, you would not gain details like clouds or a blue sky. Instead, the sky would appear as a homogeneous light grey area.
For optimal editing of a photo, no extreme values should appear in the histogram in large areas, i.e. the spectrum should not visibly bump against the right or left edge of the histogram. It is recommended to set the image style "Flat" or "Neutral" in the camera, as these image styles distort the histogram the least. To have more freedom in post-processing, photographs must be taken in RAW format. The histogram allows a much more precise image control than just looking at the displayed image, as many camera displays are not optimally calibrated and many details cannot be optimally recognized in direct sunlight for example. Almost every camera offers the option of displaying a histogram.
Correct exposure with ETTR (Expose to the right)
If there are no extremely contrasty motives, it is recommended to use ETTR. The abbreviation ETTR stands for"Expose to the Right". This means to overexpose the image so that highlights are just barely clipping to the right of the histogram. The selection of the correct image style and the histogram play a particularly relevant role. In the "Flat"or "Neutral"image style, the image should be exposed so brightly that individual pixels are just about as saturated as possible. Selecting the correct Picture Style is relevant because the histogram and highlight warning changes with it. Although the image style has no effect on the raw file, the histogram in the camera always refers to the JPEG preview, which varies with the image style set. Especially helpful is the overexposure warning, where overexposed lights start blinking. Here, it must be weighed up which areas may be overexposed and which not: If there are headlights in the picture, or if the sun is directly in frame, such highlights will almost always be overexposed, since they are ultimately very bright anyway. These highlights should therefore be ignored. The image must therefore be exposed so brightly that the brightest areas, which are still visible to the naked eye, are just on the border of overexposure. For example, clouds or a light-coloured facade should not be overexposed completely. This is the case when the very first pixels in these areas of the image start to take on the white value or start flashing in the overexposure warning. If instead of individual pixels, contiguous areas start blinking or the histogram clearly touches the right edge, the image is too bright.
If an image is discreetly overexposed, so that the maximum amount of light hits the sensor without producing overexposed (completely white) areas, it is possible to achieve a higher image quality in the subsequent RAW development by reducing the exposure than if the exposure had been "correctly" exposed. This is illustrated by the following example:
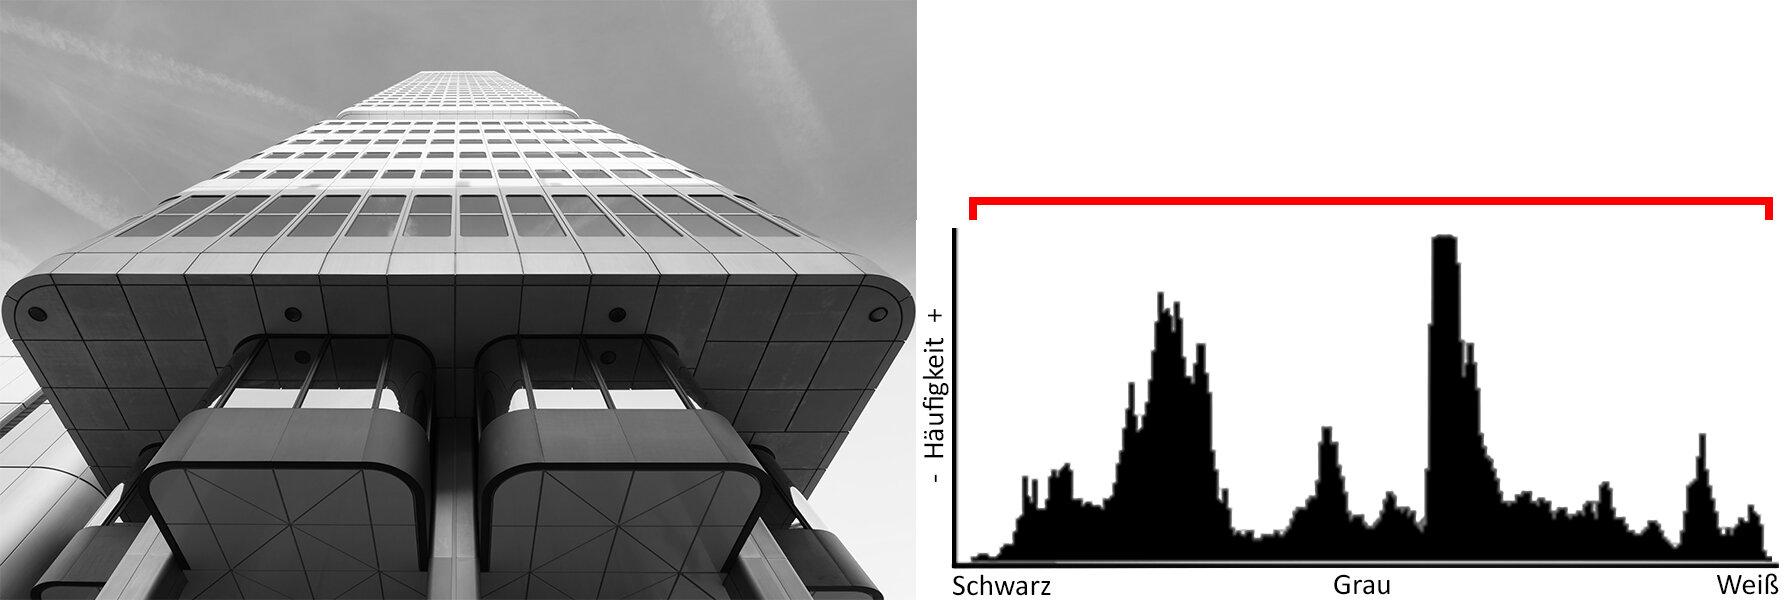
The first white pixels appear in the correctly exposed image. The tonal range is at the same time relatively large, which can be seen from the width of the histogram.
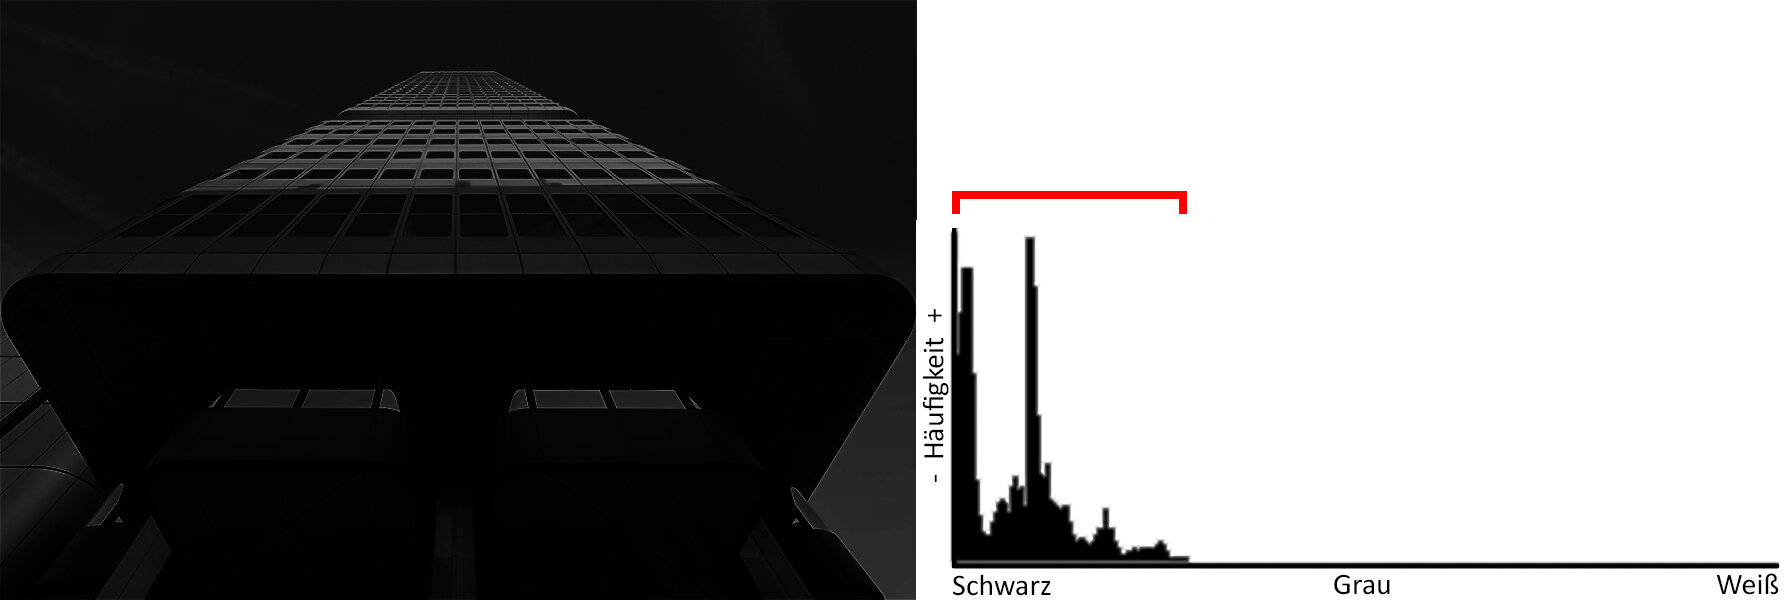
The tonal range of the underexposed image is relatively small. In simple terms, this can be estimated from the width of the histogram.
The example shows that the lighter image has a wider tonal range than the darker image. If the narrow histogram were to be pulled apart to brighten up the image, information gaps would appear and a loss of quality would inevitably result. By darkening the brighter image, the very wide histogram would be reduced in size without any loss of quality. On the contrary: From a purely mathematical point of view, there is even more information available than if the image had been photographed darker or “correctly exposed” from the outset. The brighter an image is photographed, the wider the histogram becomes and the more colour and brightness gradations are included. Only when overexposure occurs does this change again. The RAW files of modern cameras have a colour depth of approx. 14 bit, resulting in about 16,000 tonal shades per colour channel. With a dynamic range of approx. 12 f-stops or exposure stops, as is common in modern cameras, this theoretically means 1,350 tonal values per f-stop. But CMOS sensors do not work like this! Image sensors work exponentially: halving the exposure time darkens the image by -1 EV (one f-stop). The brightest f-stop can record 8,000 tones out of 16,000; the second f-stop 4,000; the third 2,000; the fourth 1,000; the fifth 500, and so on…
In this respect, the exposure should be as bright as possible in order to capture as much information as possible within the first f-stops. After all, more tonal value nuances can be stored in the lighter areas. In this respect, it makes sense in theory to always overexpose discreetly and then correct the whole thing during post-processing. On the other hand, if the image were "correctly" exposed instead of overexposing it by +1 EV, up to 50% of the information could be lost and a slightly poorer image quality would result. This additional information is needed for post-processing when it comes to darkening windows and brightening interiors! The alternative to ETTR would be time-consuming exposure series and HDR’s.
However, there are limits to this area of application: the dynamic range of the subject must be less than the dynamic range of the camera! This means that this technique is not suitable for extremely high-contrast subjects (e.g. backlit situations). If interiors are well lit, ETTR makes it possible to save almost 80% of the HDR exposure series. ETTR can be used in real estate photography. There are also other advantages. For example, the noise decreases slightly and more nuances as well as a better shadow drawing are then also present.